New Features:
- Combo Product
- Credit Limit Support
- Floor map in restaurants
- Frontend delivery date
- Images on payment methods
INTRODUCTION
In the dynamic realm of Point of Sale (POS) systems, the release of version 17 brings forth a wave of innovative features aimed at enhancing the retail and restaurant experience. Among these, the introduction of the POS Combo Products tool revolutionizes the way businesses sell, offering customers the freedom to tailor their purchases seamlessly. Alongside this, credit limit support, floor mapping in restaurants, and the incorporation of images in payment methods further elevate the efficiency and aesthetics of the POS interface.
COMBO PRODUCT
It has a new tool called POS Combo Products that comes with Odoo 17. This is a powerful feature that can change the way you sell things and make your customer’s shopping experience even better.
ADVANTAGES OF COMBO PRODUCT:
- Customers have the freedom to choose from a wide variety of items included in the combo. This makes their decisions a breeze.
- Multiple combo choices can be generated and included under a single product combo. This gives you flexibility and customization options.
- Prices of products inside combo choices can be easily manipulated. This allows you to align them with your pricing strategy.
- The combo selection interface visually represents product options. This makes it easy for customers to pick what they need.
- Customers can also compare rates between products within the same combo choice. This feature helps them make informed choices.
HOW DOES COMBO PACK WORKS IN ODOO:
1. Point of Sale → Product → Create New Product
2. Select the Product type as Combo

3. A new field will be shown as Combo choices → Add the products under Combo choices.
4. Create New products with the type as Storable
5. Product → Combo choices → New Product and Price

- Desk Accessories Combo
- Desk organizer
- Desk Pad
- Monitor stand
- Desk Combo
- Desk Combination
- Corner Desk right sit
- Chairs Combo
- Conference chair ( Black )
- Conference chair ( Blue )
- Office chair
IN POINT OF SALE DASHBOARD
Add the product in the Point of sale dashboard and select the Combo product.
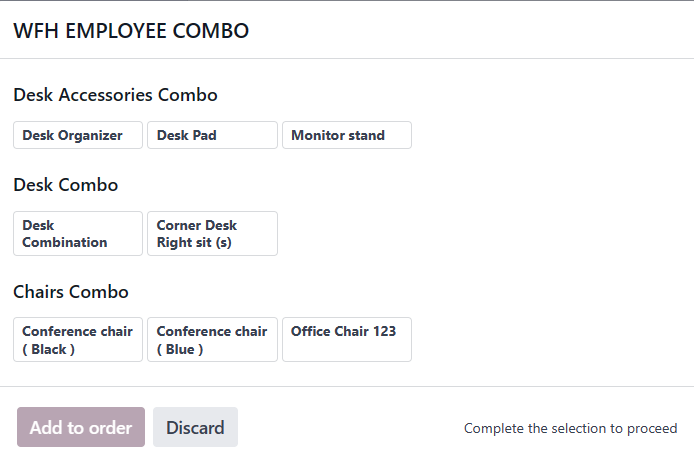
In the above Combo select the products from each category and click on Add to order button.

Once we click on the “Add to order” button, it will show in the Order line.

Add the customer, Click on the Payment button to complete this order.
CREDIT LIMIT SUPPORT
- Credit limits, a familiar concept in business transactions, now extend to the POS environment.
- Users can set credit limits, and warnings are triggered when the limit is exceeded, enhancing financial control within the system.
When a limit is reached, a warning is displayed on customer-related views and buttons.
Configuration:
- Point of sale → Configurations → Settings → Search for Credit limit
- Set the Credit limit for 5000 rs

Workaround in Odoo:
- In the Point of Sale Dashboard → New Session → Add the products ( for which the amount is greater than the Credit limit ) , Add the Customer, Then the warning pop up will be shown in the Customer page.

FLOOR MAP IN RESTAURANT
The "floors and tables map" setting is now automatically enabled by default for bars or restaurants, eliminating the need for manual activation.

IMAGES ON PAYMENT METHOD
Adding a touch of visual appeal, users can now associate images with payment methods, making the POS dashboard more intuitive and visually engaging.
1. Point of Sale → Configurations → Payment Methods
2. Select any one type of Payment Method
3. In that payment, we can add the Images.

4. Configurations → Settings → Payment Methods, where you can add the Payment methods like (Cash and Bank) so that it will appear in the dashboard while making the payment.

5. In the Dashboard → Add the Products, Add the Customer Name and click on the Payment button.
Once you click the Payment button it will redirect us to the Payment page where you can select the Payment method, there the images are shown.
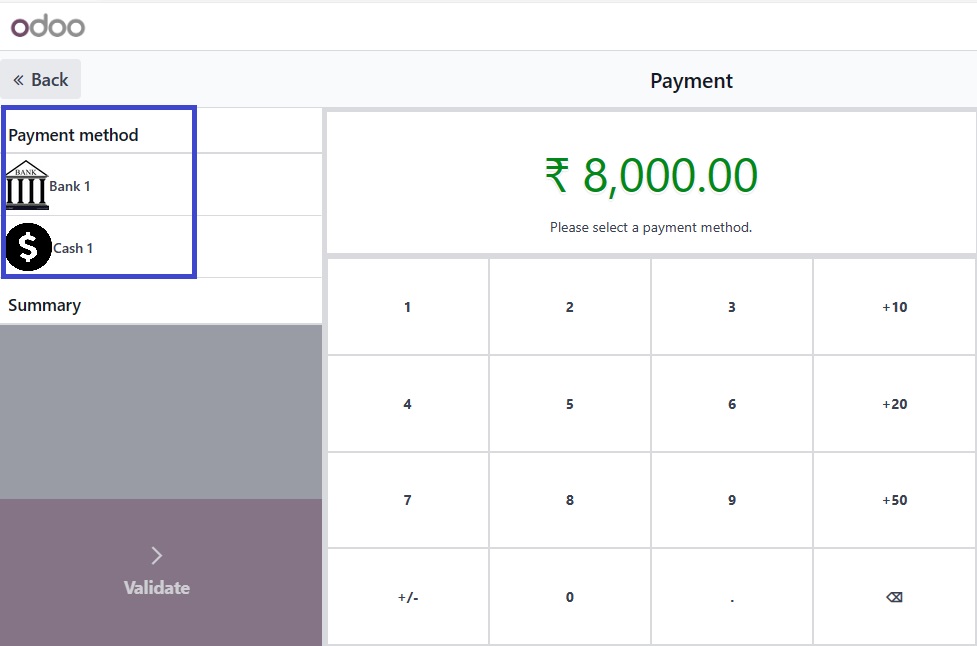
6. Click on the Validate button.
FRONTEND DELIVERY DATE
Enhancing order management, the ability to set delivery dates from the POS frontend adds flexibility and convenience.
The ship later option, coupled with scheduled dates, provides a systematic approach to order fulfillment.
1. Point of Sale → Configurations → Settings
2. Search for Deliver date
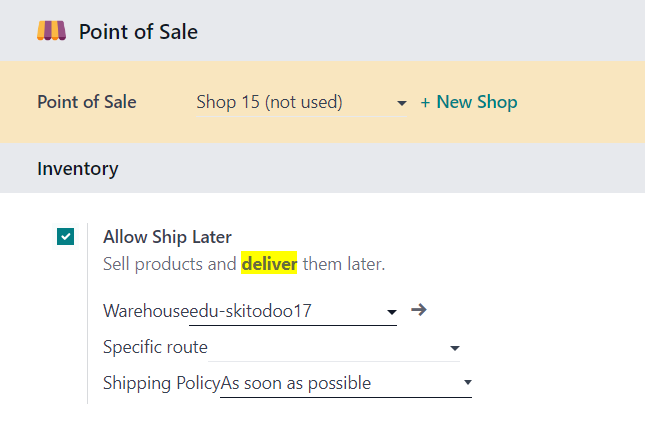
3. So that the Ship later option is shown with Date in the POS Payment page.


4. In the Backend → Go to the Dashboard → For the Session → Orders → Select the Particular order no → Pickings → Validate the order

5. Click on the Pickings smart button where you can find the Scheduled date for the order.

6. Validate the receipts, then the Scheduled date will be shown as the date which has entered in the Ship later.

CONCLUSION
In summary, POS Release 17 offers a holistic solution, enhancing both transaction functionality and user experience. With features like combo product flexibility, visual payment method elements, credit limit support, and automated floor mapping, businesses can expect improved efficiency, customer satisfaction, and operational excellence. The future of POS transcends mere functionality; it embodies a seamless blend of features and finesse.
"Are you considering a POS implementation for your business?
Look no further. With over 15 years of expertise in Odoo implementation and support services, we bring a wealth of knowledge to streamline your operations.
We invite you to connect with us for a tailored discussion on your business processes and pain points. Call us today, and let's embark on a journey towards optimizing your business efficiency."